Wednesday, February 29, 2012

hoppy to announce (use scraps)


One of my favorite things about Paper Smooches stamps is their humorous nature.  So of course when I saw this week's challenge to work with a pun at CASual Fridays, I thought of PS whose Sparks Challenge this time involves the aqua striped clock inspiration photo.


Less is More challenges you to use the scraps you have laying around and I always seem to have lots.  Especially after my marathon card production for the CPS anniversary challenge.  And cuz I never really know what to do with the little leftovers.  I think it was Betsy Veldman who said she keeps scraps on a pretty plate on her workplace.  I work on my ironing board.  Pretty plate?  Eh, no.

My square card base stamped with the Broken China distress ink "sky" was one of my three attempts from here.  The fiber was from my ribbon scraps box.  I squeezed Mr. Rabbit onto a scrap of Neenah CS since I knew I was going to be cutting him out and that paper is expensive!

Added the circle (like the clock) made from woodgrainy striped PP (like the clock) and went with the aqua and gray colors (like the clock!).  Had to give Mr. pink cheeks however.  Stamped the sentiment in gray and added the grass and a little green star.

Inside sentiment, to maintain the humor :  "you've made it through another year!"

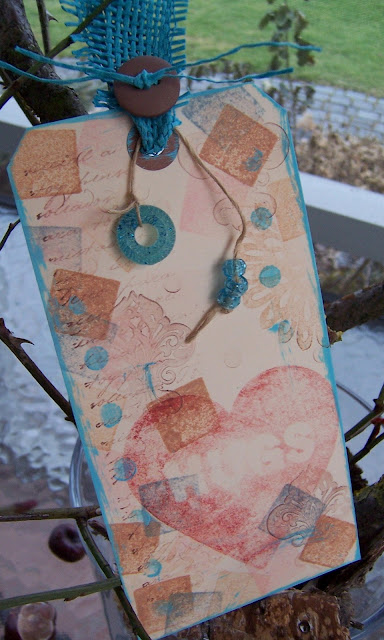
I put one more card together for Less is More, using up scraps.


Did a lot of stamping with navy ink for the Moxie Fab "Blues" challenge.  Recognize the material of the stars on this card?  Baby wipes I used to clean my very blue stamps.  Dry and flatten them, then die cut shapes.  I have sewn them together to make fabric-y looking embellies before, but this time I just laid them on the card and stitched over them.

Knowing I wanted to use red for my sentiment, I chose to use aqua thread for additional pop.  Added the sentiment and some baby bling.  No sentiment inside yet.

Thanks for visiting.


Supplies hoppy:
Paper: CS Neenah, PP Basic Grey
Stamps: squares Hero Arts, other Paper Smooches
Ink: gray pigment Cat's Eye; black Versafine, pink and blue Distress Ink
Tools:corner rounder EKS, circle cutter
Other: fiber, bead

Supplies  you're a star:
Paper: CS Neenah
Stamps:  WMS
Ink:  pigment Cat's Eye
Tools:sewing maching
Other:  baby wipes, bling

Sunday, February 26, 2012

oh-la-la...60 (vellum butterfly)

My girlfriend's sister is turning 60.  I wanted to make her a card.  But there is nothing "old lady-ish" about her.  I'm not saying 60 is old!  It's just that a lot of bday cards for 60-year-olds seem to look like they're for old people.  Know what I mean?

She is a classy gal.  But I 'm not very good at elegant cards.  I decided to stay away from the flowers and lace and frouf and let myself be inspired by Debby's CAS card.  (Do you know lime doodle?  Love the light touch she gives to every card.)  I also took inspiration from the colors at The Play Date Cafe - wanted to meet the deadline this time!


Here is my card:


I used pigment inks and one of the stamps from WMS Teeny Trees to make the flower, opting for a "orangesicle" vellum butterfly stamped with chalk ink and adhered with a rolled glue dot.

Added a piece of white satin ribbon topped with a sheer blue ribbon adding to the light and airy feel.

For my sentiment I considered the typical H.B. options, or congratulations.  Then I spotted my "oh-la-la" and decided to use it.  Kind of dainty compared to bigger messages.  To make the card special for her special day, this is how I treated the inside:


Happy day.

p.s.  Wow.  There are 8 lovely faces on my sidebar.  Welcome ladies.  So nice to see you here.  Have a great week!


Supplies oh-la-la:
Paper:  CS Neenah, vellum recycled envelope 
Stamps:  petals WMS, butterfly Martha Stewart, sentiment Technique Tuesday, 60 We-R-Memory Keepers, sentiment Hero Arts
Ink:  pigment Cats Eye, chalk Versamagic, black Versafine
Tools:  corner rounder EKS
Other:  ribbon, glue dots


Saturday, February 25, 2012

happily ever after... in your new home (watercolor paper)

Here's another peek into my creative process.  Have these things laying around.  Recognize this item?


It's what's left of the sheet that peel-off postal stamps come on.  And of course I've saved a few thinking "I could do something with this."

Enter this photo in my Living & More magazine:


And my brain thinks "Hey, I could go with that for this week's Tuesday Trigger at Moxie Fab."


I needed a Congrats on your New Home card for my cousin.  Normally I would jump all over the polka dots in this trigger photo.  BTW, Retro Mama who made this piece has a fabby blog.  Great inspiration.  But I chose to take items of the trigger and go with an artistic card.

I had such fun with this card. How did I use the trigger?
green, blue sky, red roses, curtains like fabric, polka dots on the curtains, woodgrain table, twiggy tree like the delicate fence and an overall home-y feel


Used watercolor paper.  Marked off the area where my "window frame" would go and then painted the landscape with Distress Inks as watercolors.  Stamped the tree.  Applied the window frame.  Stamped, dry embossed and stitched on the vellum.  Scored some wainscoting and swiped some Antique Linen Distress Ink across the panel.

Since I have no furniture stamps (how perfect would one of those chair stamps I've seen in blogland have been) I had to build something.  My table was an hourglass stamp in its previous life.  Fussy cut it and added a tabletop.  Stamped and pencil  colored the roses but had to freehand my vase.  Painted it too with Broken China Distress Ink.  LOVE that color.

Decided to use this wedding sentiment.  Thought it was appropriate since my cousin found this beautiful, old house they will probably stay in for many years.  Thank goodness for the quality of Hero Arts stamps - they stamp beautifully.  Which is a darn good thing cuz you don't want to ruin your entire card with a half-stamped sentiment.  I'm good at that.

TIP:  I've cut clear stamp sentiments apart to be able to use the words more freely.  But another good idea is to put a piece of cellophane tape over the area you don't want to use, ink it up, remove the piece of tape and then stamp.

Thanks for visiting.

Supplies:  happily ever after
Paper: watercolor paper, CS Coredinations, vellum recycled envelope 
Stamps: brocade Prima, branch Inkadinkado, roses/sentiment Hero Arts, hourglass Limited Edition
Ink: Distress Inks, black Versafine
Tools:   sewing machine, scissors, scoreboard Martha Stewart
Other: embossing folder Cuttlebug

Friday, February 24, 2012

Birthdays are for the birds (distress inking)

Thought I would share another episode of my long-and-winding-creative-process-road.

My destination was programmed into my GPS.  The Cure for the Winter Blues Challenge over at Moxie Fab World.

My map had a lot to do with this photo from Moxie Fab:


Absolutely love all the patterns and textures going on.  And the spot of turquoise.  Actually influenced yesterday's card too.

One tourist attraction along the way, the IKEA flyer in my mailbox.  Check out the great crazy bird tray on the left.  And next to it my first trial layout:


Used scrap birdies die cut from tissue boxes to test the layout.  My plan was to ink up CS with Chipped Sapphire and Broken China distress inks, splotch with water and then die cut the birdies.  So I did.

First detour... decided to use kraft CS for the base.  Next detour... where to place the sentiment and which sentiment?  And I knew I wanted to add something to the background, but I saw no possibilities...

Enter the Musicians of Bremen.  Not sure where they came from, but suddenly there they were in the lane right in front of me:


This opened the road for some cool background work.  And made the sentiment possible.  If you're wondering why you can't read it well... I wanted the sentiment yellow and embossed, but don't own yellow embossing powder.  I stamped with the yellow pigment ink I have and embossed with clear.  And you could hardly read it.  AAAAGGGHHH.

So, not to be brought to a screeching halt by this, I just reinked the stamp with black Versafine, stamped it and re-embossed with clear.  That's like hittin' the gas when the light turns yellow.  If it looks two-tone and a bit offset it's cuz it is!  But there is actually something cool about it.  I was just happy the second embossing didn't destroy the first.

So, last stop was the green stitching to ground the birdies on the lawn.  Because A Passion for Papertrey wants you to use needles and thread in their challenge.  And the yellow bling to represent the sun, cuz I'm still tryin to chase away the winter blues.  (And my other yellow didn't work, 'member?)

I like to liven up a road trip with a triple chocolate Blizzard from Dairy Queen.  And you?

Happy weekend.


Supplies Birthdays are for the birds:
Paper: kraft ?, CS Neenah 
Stamps: BG PTI, sentiment Crafty Secrets
Ink: Versamark, Cats Eye pigment, black Versafine
Tools: dies Tim Holtz, Memory Box, sewing machine
Other: toothbrush to splotch, embossing powder, bling

Thursday, February 23, 2012

smile (single layer card, sorta)

Blue jeans - one of my favoritest things in life.  There's something about denim.  Durable, practical, comfortable, sometimes slimming :)  Sexy too...  personal preferences I know... but for me there is nothing more sexy than a tanned cutie in a white cable knit sweater and faded jeans.  With topsiders.  On his sailboat.  Ever been to Copenhagen?  But I digress.

Just one more thing.  Did ya know that Levi Strauss was actually German?  Yep.

Where is this going you may ask?  Cath has a new challenge at Moxie Fab to use navy to "Cure the Winter Blues".  OK.  Don't have to ask me twice to use navy - blue jeans, ya know.


Decided to go for a one layer card.  Didn't quite make it, but what can I say?  It just happened.

Used a BG stamp for the floral circle.  TIP:  Instead of masking on your CS, mask on your BG stamp to be sure the image will be good around the edges.  Check Mandi's tip here.

Put a mask over the stamped image and stamped the borders.  Added lighter blue too to pep it up.  The theme is "CURE the blues". 

Wanted to try vellum butterflies after seeing Debby's uber-gorgeous card here.  Do want to CASE her card one day soon.

Had stamped some CS with various BG stamps and punched hearts and circles from them, but decided to adhere just the one polka dot heart with pop dots.

Added some mini navy blue pearls and a clear embossed "smile".

Used punches for the circle, heart and butterflies so I am entering Less Is More's challenge Week 55

Ahoi mateys.


Supplies smile:
Paper: CS American Crafts, vellum (recycled envelope)
Stamps: BG CHF, borders Artemio, butterflies Martha Stewart, polka dot BG Mint Motif, "smile" PTI
Ink: Versamagic chalk, Versacolor pigment
Tools:  butterfly punch Martha Stewart, heart The Paper Studio
Other: embossing powder, pearls


Wednesday, February 22, 2012

celebrate (ribbon/tulle)

Back with another post today.  This one's gonna be on time... barely.
Combined this lovely from Lily Pad for Virginia's View challenge and CASual Fridays request for ribbon:


CASEd myself again. I loved this card I made for the CPS anniversary challenge so I used the idea again, just changed up the colors.


Without further ado here's my card:


The polka dots of the inspiration photo were the first thing that caught my eye!  Love 'em.  Went with that for the stamped borders and embossed cake layers.  Opted for candles on the cake.  And my ribbon, besides the stamped one, is tulle that I ruffled for the bottom cake layer and that I backed my sentiment banner with.  Thought the little bit of red messy stitching lightened the card up a bit from my wedding version.

Thanks for visiting today.


Supplies celebrate:
Paper: CS American Crafts,
Stamps: borders Artemio, candles The Paper Company,  digital cake stand (123RF)
Ink: Cats Eye
Other: embossing folder Cuttlebug/Sizzix, tulle, sewing machine, letter stickers KI Memories

late for the party

I cruise the Internet taking notice of various challenges.  They roll through my mind over and over.  Keep me awake sometimes at night.  Then I get an idea.  Make a card.  And when I go to post I'm late to the party.

First example:


The Play Date Cafe challenge 119 was to use black and white with a splash of hot pink.  Was beyond me until I was flipping through my stamps last night looking for something else when this Martha Stewart set jumped out at me screaming "make me black and white and let the tulip be hot pink."  OK.  Seriously, probably the quickest card I've ever made.

Late to the party.


Remember this inspiration photo?  The last  Moxie Fab Tuesday Trigger maybe.  Tuesday.  Unfortunately due on Sunday!

But, I decided to go with the "Chicletic" anyho.  I had thought about this Trigger photo awhile.  Knew if I touched it, it would be with distress inks.


 Then I saw the Simon Says Stamp challenge to make a tag (too late for this one too I just saw :().  And the Simon Says Stamp and Show challenge to include N.Y., London or Paris.  And the girls at Lawnscaping want you to distress.  And CPS has another cool sketch that fits the headboard idea of the Trigger.

This Week's Sketch

OK, so this actually came together.  Girlfriend's bday approaching.  She likes to read.  Enter tag/card/bookmark.


Stamped tag with BG stamp using pigment ink and heat embossed with clear.  Applied Worn Lipstick Distress Ink.  Stamped white CS with distressed harlequin BG and cut strip. Had to make my own Eifel Tower out of foam... stamped with Versamark and heat embossed with black. 

Die cut the half-circle from gold hammered CS and stamped with ticket stamp using Stazon.  Applied letter stickers and teal (looks blue) seam binding.  Stitched it a few times with gold metallic thread (by hand - my machine won't work with it).


Distressed tag edges.  Applied Vintage Photo to edges.  Stamped with French text BG, Tim Holtz spots and some swirls.  Used bubble wrap to hit it with some white acrylic paint.  Added seam binding and ribbon to hole and tied with gold metallic thread.  Hung two beads on thread.

It's fully loaded.

Notice the blue around the top of the tower?  Tried to freehand it first, using an embossing pen.  For some reason the embossing powder didn't stick, thus the homemade foam stamp.  The blue?  Hey, it's a distressed card.  I don't care.

OK, so important question for you.  How do you keep track of challenges/due dates?


Supplies feel better soon:
Paper: Neenah,  pink unknown but cute embossed with hearts
Stamps: Martha Stewart, text WMS
Ink: pink Cats Eye; black Versafine
Tools:  clear embossing powder,sewing machine


Supplies  Paris tag:
Paper: Neenah
Stamps:  backgrounds CHF, Tim Holtz, Crafty Secrets
Ink: black Versafine and Stazon, Distress Inks
Tools: die Spellbinders, edge scissors
Other:  clear embossing powder, bling, metallic thread, seam binding, beads, letter stickers KI memories


Tuesday, February 21, 2012

make a wish! (embossing w/impressabilities )


This was an experiment.  Twofold.  Wanted to try out an Impressabilities plate.  And masking to achieve a typographic look.  Had the Jay Gee's Nook challenge in mind.  Again :)


Happy with the embossing.  Used my no more shims mat again.

Not so happy with the typography.  Would probably be better with more and smaller messages.  Added the twine to give at least the left side of the text a boundary.

Thanks for your visit.


Supplies make a wish:
Paper: Neenah, CS Coredinations
Stamps: text The Paper Company, butterfly Martha Stewart
Ink: Versamagic
Tools: corner rounder EKS
Other: cotton twine, tag

Monday, February 20, 2012

thank you (use up scraps)


This mess was my craft/laundry room after my CPS anniversary challenge cardmaking marathon.  Not pretty!  But before putting everything away, I challenged myself to make some cards using up scraps from the cards I'd made.  Here are two.


From the scraps of this card.  Made this using the watercolor Distress Ink block BG (it had taken me three tries to get the placement for the layout on the CPS sketch right!)  Used the leftover strips and "hung" them up as if they were fluttering in front of a window.  Stitched at the top and balanced it out  with a sentiment.

The next card was inspired by the napkin holder on my table


and a card at CASE StudyChallenge awhile back.


I used the scraps of this card, stamped gingham BG squares, added a scalloped edge and a banner sentiment.  (Planned to make a birthday card with a sentiment "fluttering by with a big birthday hi"  then realized my scraps said "thank you"!)

Supplies birthday:
Paper: Neenah, watercolor paper, cardbase Buttinette
Stamps: SEI, Tim Holtz, sentiment Mint Motif
Ink: Distress Ink; black Versafine
Tools:  scissors, sewing machine

Supplies thank you:
Paper: Neenah, CS Coredinations
Stamps:SU; sentiment Hero Arts; BG CHF
Ink: Versamagic
Tools: punch Martha Stewart, edge punch EKS
Other: bling


Friday, February 17, 2012

welcome baby (use ribbon & scraps)

TGIF (no tutoring)!  I just created two items.

Got an email from Waltzingmouse today and realized I hadn't been there for awhile.  Saw this sketch:


WMS Sketches_MS font_separate


remembered that Really Reasonable Ribbon's Challenge #42 is to use pink and brown and ribbon and decided to use up scraps from last week's card.  Since the scrap of homemade PP I had left was skinny, decided to make the center piece a tag.  So Simon Says Stamp Tag It here I come.


CASEd myself sorta.  Stamped the treetops from WMS Teeny Trees in a random pattern with Versamagic chalk ink, keeping in mind that I would wrap the mid-section with seam binding.  Also stamped a border on the inside.  Stamped welcome baby from WMS Say It Loud - great set - and heat embossed with clear powder.

TIP:  use pigment inks to stamp and emboss with clear powder instead of adding millions of embossing powder colors to your stash.

Attached seam binding (can't see the wrinkles in the photo) with score tape.  Attached buttons with glue dots.  Finished up tag top with a spot of Basic Grey PP and attached to front with dimensionals.

Non-traditional colors perhaps, but the cute circles make it OK for a baby.  I think.

Next is a tag I just assembled for Simon Says Stamp.  The stamping was done over the past week.  Frugal as I am, I like to stamp off on an empty tag before actually cleaning my stamps.  The images are a bit lighter, but that's cool too.

Just added the burlap-y ribbon, button and beads strung on twine and voila:


Have a great weekend and keep your nose out of trouble.  That's what I always tell DS.  Doesn't always work...


Supplies welcome baby:
Paper: CS Neenah; PP Basic Grey
Ink: Worn Lipstick Distess Ink; Versamagic chalk; Cat's Eye pigment
Tools:  scissors, corner rounder EKS
Other: clear embossing powder, buttons (Sew Sweet), cotton twine; seam binding

best wishes Mr & Mrs

I love the inspiration photos at Paper Smooches Sparks Challenges.  Here is the current photo, love the feel of it:


Hmmm, what to do with it without just reproducing it.  The photo spoke to me and said "heart=love=wedding".  And gotta do something with the red thread and gold pin...


Have the "Word Up" set from PS and decided to combine "best wishes Mr and Mrs".  So, who should be the Mr and Mrs?  How about the little birdie from Kim's CHF "Mocha Chica".  But I need two.  How about stamping a mirror image like Jessica explains here.  Went with peachy colored PP for the birdies.  Gave Mrs. red lips and eyelashes.

Was originally going to use kraft but then decided on gray CS.  I think it works better with the reddish tones here.  And definitely with the gold, but more on that later...

Incorporated the red thread with stitched phone lines.  (Decided to stitch one peach, not sure if that was a good idea.)  TIP:  used a drafting compass to lightly pencil lines before stitching.

Stamped the sentiment with black first, but it didn't come out perfectly due to the CS texture.  SO, decided to restamp with Versamark (thank goodness for clear stamps!) and then heat emboss with gold.  Got my gold in!

The heart (from crepe paper) just seemed necessary.

What bugs me a little about this card?  Mr. is perched a bit above Mrs.  Not my take on life, FYI -   DH already knows this case he's reading.  Just a design thing.

Happy weekend.


Supplies best wishes Mr & Mrs:
Paper: CS American Crafts; PP Cosmo Cricket and Making Memories
Ink: black Versafine; Versamark
Tools: sewing machine, scissors
Other: gold embossing powder

Thursday, February 16, 2012

Helau!

Karnevalsprinz
(from Toonworkshop.de)

Today things get crazy here in Germany.  The final countdown to Fat Tuesday has begun!  Check this if you're interested in learning more about the 5th season here in Karneval-land.

And HELAU!  I finished my 15th card for the CPS anniversary challenge!  Big shout out to Tami for this fun challenge.  Pushed me to my limits (photo of my messy laundry/craft room to come) but I loved it!

Combine sketch #231 from day 15 of the challenge


with the Joy Ride PP from Cosmo Cricket and my BFF's son who will turn 7 this year and this is what you get.  He is old enough to read the message himself too.  How fun!


Rare for me, but the only stamping on the front was the highlighting of the "7" with some heat embossing!

I stamped the inside with a happy birthday message and the same circle stamp.  TTFN.  Off to eat a Kreppel!

Thanks for your visit.


Supplies You Are Here:
Paper: card base Butinette; PP Cosmo Cricket
Stamps:Artemio
Ink: black Versafine
Tools:  sewing machine
Other: white embossing powder


Wednesday, February 15, 2012

life's simple pleasures (interactive?)


When I saw Papertrey's challenge yesterday I figured I would be sitting this one out.  Movers and shakers is not me.

But alas, I am still working on the CPS anniversary challenge and sketch #242 for day 7 was one of the sketches I still had to do:


Well, if you turn it sideways and combine it with this groovy tutorial from Susan for a multi-fold card, I decided you get this:


Tough to photograph, especially on a windy day!  And if you open it up you get:


Looking for the interactive-ness?  How about count the birdies?


I used the color combo from CR84FN:


DD just came home from school and got all excited about this one.  New technique for Mom.  Guess she approves :)


And I struggled big time with CPS sketch #26 of day 10.  Too scrapbooky for me:


But alas, that is what is so cool about sketches.  Just gather your goodies and let the sketch do the talking.  Again I hit my stash of previously stamped images and scraps and lo and behold (two hours later I must admit) this emerged:


I do likey, even though getting the balance was tough.  Hope you likey too!


Supplies life's simple pleasures:
Paper: CS American Crafts; PP me and my big ideas
Stamps: PTI
Ink: gray pigment Cat's Eye; chartreuse Versamagic
Tools:  score board, cutting knife, reed bird/tree  dies Memory Box
Other: clear embossing powder

Supplies million and one thanks:
Paper: card base Butinette
Stamps:  shadow squares Hero Arts; flowers SEI; sentiment Technique Tuesday; embossed text on strip Tim Holtz
Ink: Tumbled Glass, Scattered Straw, Wild Honey Distress Ink; black Versafine
Tools:  leaf die Spellbinders;  sewing machine
Other: handmade flower, white embossing powder


thank you (sentiment embellie)

Three more cards for the CPS anniversary challenge!  Havin' a blast with this mega challenge.  15 cards to make before Saturday and I started late...

The first:


Based on sketch #45 from day 14:


Doesn't get more literal than this.  I kept it plain and simple to let the beautiful watercolored-with-markers Hero Arts image stand front and center.  Mounted on CS.  Added one strand of shiny twiny to mimic the grass and then a handmade red poppy.  I know a lot of people can't handle the combo of red and pink, but I happen to love it.

Red, pink and green are on the palette at Kathy's Lily Pad Challenge.


And I made it a "Hello" card and used Hero Arts stamps for their monthly challenge.


The second:


Based on sketch #118 from day 12:


This was a stretch of the imagination, inspired by Vicky's "Hey Chickie" card here.  My uncle had a rough year.  Lost his wife.  Moved out of their home.  He's finally in a place closer to his caregiver and I hope this card finds him happy in his new home tweet home.

I picked the colors from The Play Date Cafe's challenge #118:


Tip:  What to do with the ends of twine on your card front?  I glue them down with Glossy Accents and rather than adding another piece of CS inside to cover up the end (I have to pay airmail rates), I add a little heart.


My third card today uses the embellies as my "thank you" sentiment.  Based on sketch #5 for day 9, here it is:


Here is the sketch from CPS and the color inspiration from Jay Gee's Nook Challenge #16:


I love rainbows.  And these Versamagic chalk colors are so cool.  Not the standard RAL colors.  Before I started I pencilled a curve to follow when stamping.  I stamped with a small clear stamp which I curved on my acrylic block to match my pencilled curve. 

First I was going to punch the embellies as circles like in the sketch.  The sentiment would have been readable-er.  But I chose to punch butterflies.  Less text to read, but I love the light and airy feeling.

I'm not happy with the faux stitching around the edges - wrong color gray and old marker.  Why didn't I stitch it for real?  I overlooked that rounded edge piece in the sketch and didn't want to pull the card apart :( 

As they say, haste makes for ... suboptimal cards.

Thanks for visiting today.  Happy Valentine's Day.


Supplies Hi:
Paper: Neenah; CS American Crafts
Stamps: Hero Arts
Ink: markers, black Versafine
Tools:  edge punch EKS
Other:  twine, fabric flower

Supplies Home Tweet Home:
Paper:  CS American Crafts and DCWV, woodgrain PP Bringmann
Stamps: clouds Sassafrass; birdhouse/bird Inkadinkado; sentiment Technique Tuesday; inside EKS
Ink:  Aladine,  black Versafine
Tools:  die Spellbinders; corner rounder EKS
Other: twine Sew Sweet

Supplies thank you:
Paper: Neenah
Stamps: Artemio; sentiment SU
Ink: Versamagic; black Versafine
Tools:  punch Martha Stewart
Other:  satin ribbon, bling


Related Posts Plugin for WordPress, Blogger...