Sunday, May 31, 2015

STAMPlorations inspiration #20

How's this for inspiration? Take a stamp. Take a stencil. Make a card :)


I'm a sucker for hugs, so this one was easy. A white cardbase. An array of Distress Inks in red, orange, yellow and green and a sentiment from STAMPlorations Fond Expressions. Some pearlescent embossing paste and "hugs" from ARTplorations Hello and Company. Three sequins and it's a done deal!

Need more inspiration? Check out the cards from the rest of the DT and find one you'd like to CASE, then join us at the Inspiration CASE Playground. It's open until June 5th.

I'm parking this card at the Anything Goes challenge over at Simon Says Wednesday Challenge.

CU tomorrow!

Friday, May 29, 2015

day 5 ARTplorations stencil blog hop


Welcome to the final day of the ARTplorations stencil blog hop. Hope you enjoyed it. Did you see my card for day 1? I told you how I had some "glow" in mind, but couldn't move past the CAS white version.

Well I moved past it.


Slightly different placement of the stencil. Some extra stamping of text and black dots. And lotsa "glow" created by smearing gelatos around with a damp finger. Not as cute as Melissa P.'s original tag was for the MIM segment, but an interesting technique.


Thanks for looking. I hope you left comments along the STAMPlorations blog hop and even made a card with a stencil for the Flash Linky Party. Shery is so generous with prizes. Check out the deets here.

I'm playing with the ladies over at Seize the Birthday with this Anything Goes birthday card.


And at Simon Says Stamp Wednesday's Anything Goes challenge.

Thursday, May 28, 2015

day 4 ARTplorations stencil blog hop


Welcome ! We have been exploring the plethora of beautiful designs available in the shop. My card today uses Daisy Dance, which was designed to work with the daisy image from Bloom Sketches too.

If you saw my project for day 3, you know I had a spatial thinking issue with this stencil. I had to give it another go.


Distress inks with ink daubers, the stencil AND the stamp this time. And I'm very pleased with the result.

The heat embossed white sentiment on vellum is nothing new, but this piece of vellum was laying around when I reached for vellum and I decided not to trim it and attach it along the top like I usually do, but rather with a strip of stitching down the left side. I love how the air underneath it diffuses the BG a bit. I also love that new-to-me DI color, Victorian Velvet which is behind the daisies.

So today and tomorrow are extra days over at the blog. But you can join in now by making a card with a stencil and hooking up here. You can also check out my teamies' extra projects and the prizes up for grabs.

I'm playing with the gals over at Seize the Birthday where it's Anything Goes.


Thanks for coming by today. Have a great day.

Wednesday, May 27, 2015

day 3 ARTplorations stencil blog hop


Welcome to day 3 of the ARTplorations stencil blog hop. We are exploring the plethora of beautiful designs available in the shop. My card uses Daisy Dance, which was designed to work with the daisy image from Bloom Sketches too.


On a side note, have you seen Shery's card ? I was completely stumped when I saw it until I read how she'd created it using the stencil and stamp.

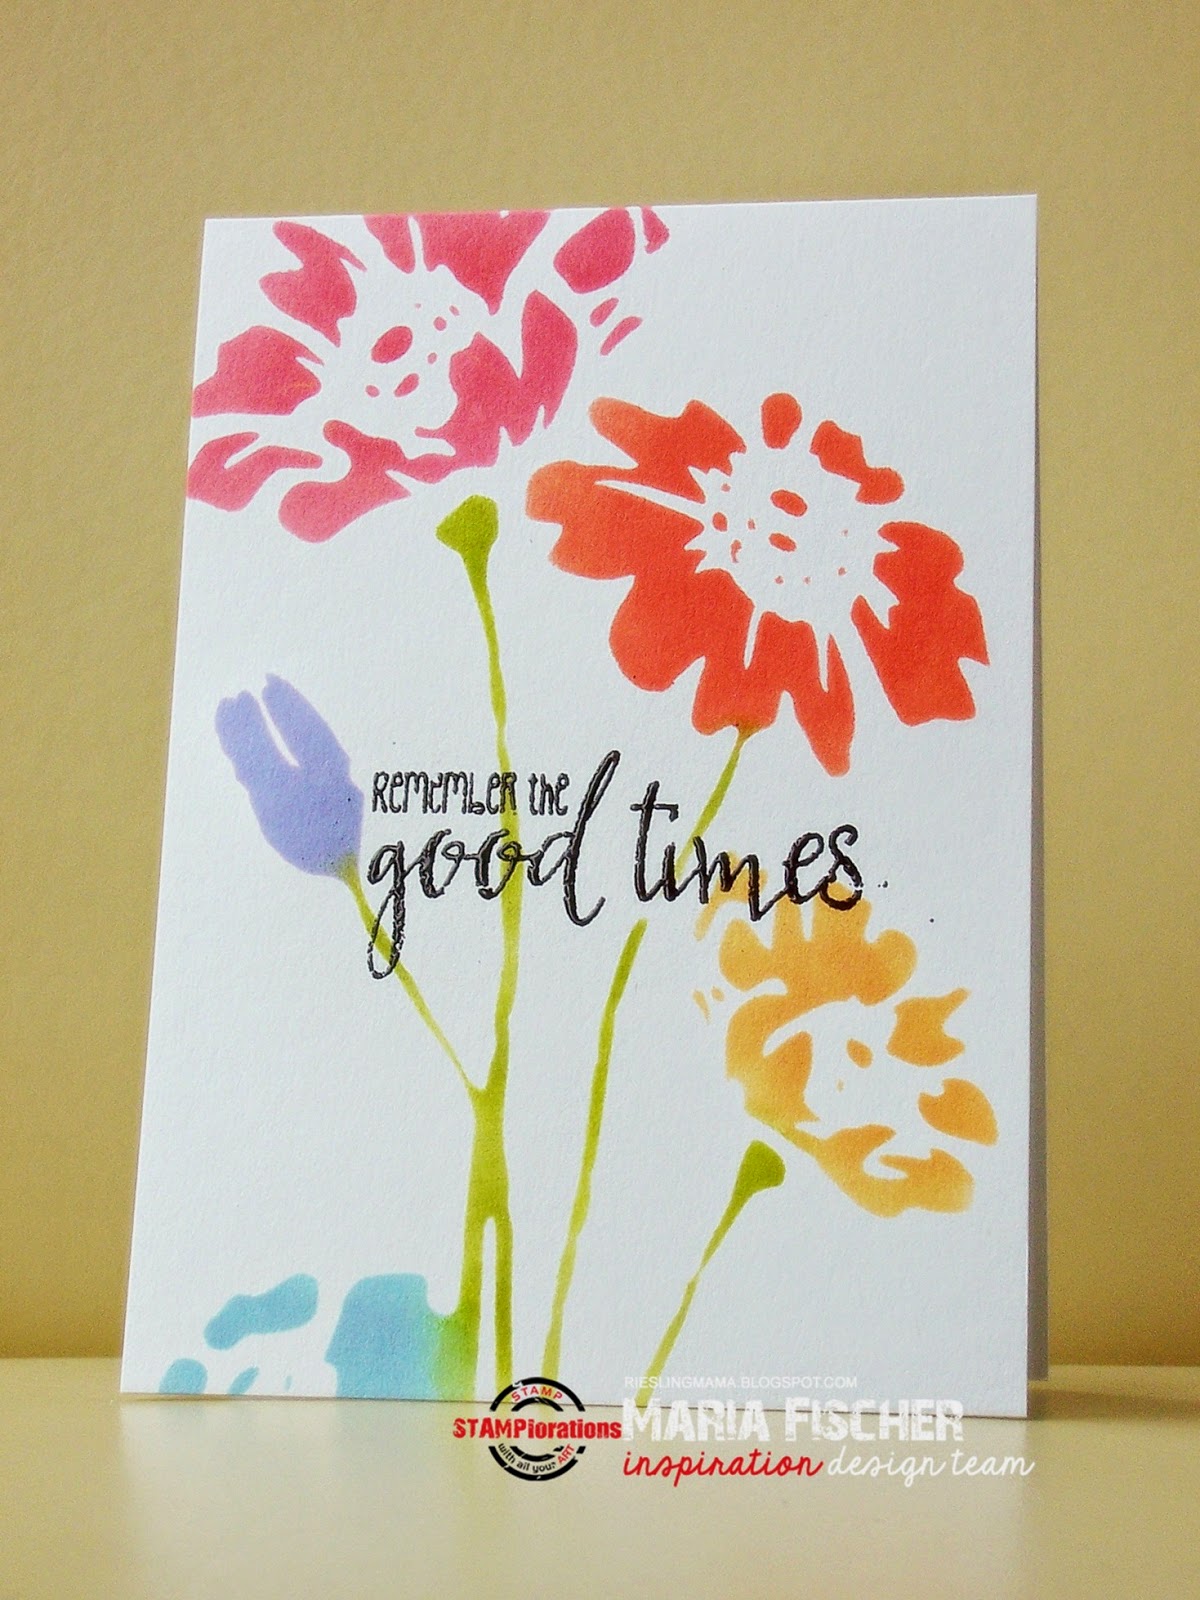
Here's the basic idea. You create a BG. Lay the stencil over it and fill the "holes" around the daisies - with gesso or a darker ink. Then you remove the stencil and stamp with the daisy image.

But you know me. No basics for me. I had seen LeeAnne C.'s card and was enamored with the pale pastel colors achieveable with her technique. So.

Go ahead and check out her tutorial. But come back, OK? You'll enjoy my story ;)

So. I inked up the stencil with yellow and orange Distress Inks, spritzed it and "stamped" it onto watercolor CS. Dabbed up the excess water. That's how I got the pastel yellow/orange daisies. Cool, eh?


Then I put the stencil down and inked the daisy centers with yellow and orange and around the daisies with Shaded Lilac DI and around the center daisy with SSS Lavender too. Some water splatters. A touch of Perfect Pearls mixed with water for shimmer. So far so good.

Now I am the first to admit that I am the worst at spatial thinking. As in, horrible. So when I got to the point that I decided I needed some white on my BG and so I would heat emboss the daisies white, but after five minutes couldn't figure out how to make the stamp line up with my yellow daisies... well then I remembered that I suck at spatial thinking! Or should I just say at planning!

Cuz I had "stamped" the daisies with the "reverse" of the stencil (yes, there is a front and back)! Which is null problemo, unless you want to come back and use the stamp ;)

So. My touches of white took the form of a grungy center from STAMPlorations Mixed Media Grunge. And I heat embossed a sentiment from Fond Expressions onto vellum, die cut the edge with MFT Snow Drifts and added some washi up top and at the bottom for oomph.

Ya live, ya learn.

Check out my teamies' beautiful projects and the prizes up for grabs here. Have a look. We hope you are enjoying this week of stencil inspiration. Oh, and mark your calendars for June 29th. STAMPlorations is turning TWO and we will be celebrating for a week!

Tuesday, May 26, 2015

day 2 ARTplorations stencil blog hop


It's day 2 of the ARTplorations stencil blog hop and who doesn't love stencils? My next card brings you more flowers, this time using Tulip Prints.

When I saw this stencil I knew I wanted to give it a go in the style of Marimekko. I've been a fan since my college days thanks to my roomie. Which reminds me... I graduated from Hillsdale College 30 years ago this month! Cripes I'm old.


I used Distress Inks and ink daubers to color the tulips. I temporarily plugged the holes of the tulips I didn't want to color with the little masks Shery includes with the stencil. What a great way to avoid mistakenly getting ink where you don't want it!

When done inking, I traced the two tulips with a a fine black marker. After removing the stencil I went over them with a thicker black marker. TIP: Do the tracing first and inking second so that  if you end up with wonky looking leaves you won't be too committed to pitch it and start
over ;)


I was inspired by fabric, remember? Thus the textured CS, the gingham PP strip along the left edge and the wrapped thread, albeit, gold metallic. Because gold.

And like in yesterday's card, I couldn't bring myself to cover up any of the stencilled area with a fancy sentiment banner so I added a fussy cut heat embossed sentiment from STAMPlorations Fond Expressions!

I'm playing at Simon Says Stamp's Wednesday Challenge "Stencil It" with this card too.

Check out the projects from my teamies and a list of all the fabulous prizes up for grabs here. Have a look and have a great day. Thanks for visiting :)

Monday, May 25, 2015

day 1 ARTplorations stencil blog hop


Who doesn't love stencils? And Shery R. of STAMPlorations fame has created a plethora of beauties. I had to start with this floral image, Happy Flowers. And yes, they make me so happy. 


Funny thing is, my plan was to give the blooms a "glow" a la Melissa P. of Papertrey. I even chose ink colors (Adirondack Aqua, SSS Lavender, HA Pale Tomato, Adirondack Mountain Rose, Adirondack Peach Belline) that worked with gelatos colors I have. But once I had this inked up and ready, I couldn't bring myself to cover up any of that lovely white space. Call me crazy!

Just added a heat embossed sentiment from STAMPlorations Noteworthy smack in the middle.


All the projects from my teamies and a list of all the fabulous prizes up for grabs can be found here. There's also a Linky Party where you can hook up a stencil project by May 31st and have an extra chance at a prize. Have a look and enjoy the stencil hop this week.

I'm throwing my stencil project hat in the ring over at Simon Says Stamp's Wednesday "Stencil It" challenge.

Saturday, May 23, 2015

hello flowers

Hope you are having a beautiful Memorial Day (if you're in the US) or Pfingsten (if you're in Germany) weekend. I'm sharing a card I made based on two challenges whose deadlines I totally missed. But I'd had the idea and had even made a start... so I finished it up to share.

Saw this gown at RIC. If you look closely, you'll see that those are actually photos of the blooms on the fabric. At least I think they are. Which had me wondering how to recreate that vibrancy.


Saw this sketch during the Winnie Walter/Pinkfresh iNSD week.


I had decided to vibrantly watercolor some In Bloom: Addie's Garden blooms, then fussy cut them and adhere them to black CS. Didn't really know what I'd do after that. So I did some no-line watercoloring. Put them to the side to dry. And forgot about them.

Then the sketch prompted me to think about punching portions of the blooms on squares and circles (still fussy cutting the blooms and then adhering them to black squares and circles). Well I got real lazy on that one and just punched portions of the blooms. And this happened.


The design reminds me of a wall in an art gallery (not cuz of the quality of the painting!). Although I must admit I am happy with how the yellow tulip turned out.


And notice how the circles also made their way into my design? (And stray glitter from that dang Ranger Enchanted Gold embossing powder!)

I'm joining in at:

Craft Stamper - Take It, Make It for May to use a stamp
Uniko Studio - #21 Flowers (Happy Birthday to Bev!)

Have a great weekend. I appreciate your visit.


Friday, May 22, 2015

STAMPlorations inspiration #18

"To have and to hold" - five words which no doubt immediately bring images of wedding to mind. I chose to concentrate completely on that sentiment from The Bee's Knees Newlyweds Extras for my wedding card.


I dry embossed a white panel after inking the raised areas with silver Delicata ink. Then I lightly applied gold Delicata ink to the raised hearts in the embossed pattern. After that I swiped the gold ink onto a scrap of white CS and heat embossed the sentiment.  Maybe you can see the gold and silver better in this photo...


I layered the sentiment with vellum and PP and adhered it to the panel which I then put onto a black cardbase.

Have you joined us over at STAMPlorations in the Inspiration CASE Playground yet this month? Need to make a wedding card? Why not CASE my card... gold, silver, black, white, flourishes, art deco ... so many elements to choose from to create your own card.

Or check out the inspiration from my teamies today. Or if you're feeling more "kraft-y", check out this month's CASEplorations post for inspiration and the prize deets.

I am hooking up over at MUSE #118 cuz I really liked Marion's light gray BG and black frame around her focal image. I just ended up tilting everything a bit.


Thanks for visiting today :)

lime and grape - yum!


Wings and foil - that's what it's all about at the Mixed Media Card Challenge in May. Butterflies, insects, birds, angels... find some wings and show us your mixed media skills.

We received a graduation announcement and it had a wonderfully 1960s/hippie vibe to it. I checked out the gal's school website for her colors and purple it was. Even found her class motto "live, love, dream".  (How did we ever live without the Internet???) So off I was...


Guess I don't have a "live love dream" sentiment, but thought this one from Freckled Fawn would do the job. So I heat embossed it onto a panel I'd watercolored and splattered lime green.

Stitched it with a layer of vellum to a cardbase that I smooshed and splattered with leftover watercolor before splattering some water droplets onto it which I covered with platinum embossing powder and heated. TIP: Heat from underneath the paper to melt the powder if it is only "attached" with water.

The feathers from Lifestyle Crafts (wings have feathers, right?) were die cut from watercolor paper and painted purple and blue before being edged with platinum embossing powder. A smidge of washi finished the card.


Voila! A somewhat unconventional, but very personalized graduation card.

Since I used NBUS - the feather die and the sentiment stamp - I'm joining the "New" fun at A Blog Named Hero.


Thursday, May 21, 2015

it's that time of the year

Graduations. From high school. From college. Tons of them in my circles this year.

Here's a very personalized card for my cousin's son who is incredibly intelligent. As in, got a top notch job with Microsoft right out of college. Which he completed with a BA and MBA in less than four years. Just sayin'. (Must have been genes from his dad's side of the family ;)

Now I doubt that my handmade cards mean much to him, but this one just may evoke a smile.


Easy peasy. Google the Microsoft logo, grab the MFT Graduation Accents and PTI Congrats dies and voila!

Easy peasy. Hook up to Little Red Wagon's To Die For challenge and Curtain Call's


Thanks for looking.


Wednesday, May 20, 2015

addicted to ... hummingbirds

When I saw the hummingbird stamp in The Birds and The Blooms, the current Stamp Club set from STAMPlorations, I knew it would grace my Dad's Father's Day card this year. But how?

I figured Dad would like a "simple" watercolor version since he thinks many of my designs are a bit "kooky". So I gave the no-line-watercoloring another go. Stamp the image with Antique Linen Distress Ink. Watercolor it. I used watercolor pencils since there were lots of tiny spaces. Geez Louise, this nearly killed me.


I googled "hummingbird illustration" and selected one that reminds me of the one who hangs out at Mom and Dad's. Enter my problem with spatial thinking again. The illustration was facing left. Mine is facing right. And so my creative session went!

I'm so not thrilled with the result, but the wonky black mat and that wonderful sentiment saved it for me. He's certainly not going to praise my watercoloring skills (he was a graphic artist) but maybe he'll be awed by his presents. This ridiculous thing for starters (thanks, Darnell K.) And a 7 lb. bag of corn cobs to go with it!

And I must practice or hang up my paint brush.

I'm joining the fun at:
Addicted to Stamps #145 where the light and airy birds and branches inspired me.


Addicted to CAS #63 where it's all about birds!


Happy Hump Day!

Tuesday, May 19, 2015

rockin' geometric

Do you love all the geometric patterns floating aroud the blogosphere lately? If you can't get enough of 'em, you must check out Taheerah A.'s Gossip Column over at Winnie and Walter. And then join the challenge like I did.


Kinda crazy, eh? In my mind I planned to use this little gal from Aha Arts, backed with a bit of the Multifaceted die cut from pink metallic CS and some big sentiment all attached casually to a white card. Ha!

The purple glitter CS caught my eye, which led to the purple cardbase and incorporating touches of yellow, and this card was born! Notice how the corner with the heat embossed sentiment (inside reads "birthday girl") looks pinker? That happened when I heat embossed. Hm. What up with that?


The challenge at Mod Squad is to use stamps from two or more stamp sets. I've got two Aha sets and two Winnie and Walter sets (Mini Scenery: Multifaceted and My Precious) on this card!

Wanna see something cute? DH and DS had to solve a problem in my laundry room which involved me having to move my craft stuff out of a whole corner of the room for them to be able to work. When they were done I found this. Notice the boxes which hold my dies...


See what DS added to the chalkboard panels - normally there are only the letters (I have them sorted by manufacturer). Is he a charmer or what?!?

Have a good one.

Wednesday, May 13, 2015

one layer christmas #9

A Christmas card for you today. Was made for a publication call way back when, but uses an interesting technique I'd like to share. Great for adding interest to a one-layer card.

Take a good look at your stamps and see if you have some that are symmetrical. They can be used like this.


Use the reverse of the stamp to stamp solid color and then use the outline image to heat emboss. Even cooler - some letters can be used the same way.


I used large circle stamps inked with Distress Inks and spritzed with water. Then I used the reverse of poinsettia (Waltzingmouse) and alpha stamps (Hampton Art) with darker colors in the same manner to stamp the shadows. When it was dry, I heat embossed the poinsettia and letters!

So, one layer and Christmas. Quite the clever challenge idea, eh? Get 'em done early to avoid the end-of-year rush. And keep 'em one layer to avoid paying extra postage.


Hook up a one-layer card with an angel on it and you could win an ARTplorations Christmas stencil.

Monday, May 11, 2015

STAMPlorations inspiration #17

Have you ever snitched a swatch of wallpaper from the builder supply store to test it on your own walls before buying? Or, um, just to craft with?


Makes the perfect backdrop for a vibrant, large sentiment, right? Like this one from STAMPlorations Noteworthy. Just add some torn cardboard and vellum, stitching and a couple sequins.


Of course some red heat embossing, re-embossed with some glitter embossing powder doesn't hurt either.

Check out the other inspiration projects over at STAMPlorations. Feel like CASEing one of them? Then be sure to join us in the Inspiration CASE Playground.

I'm heading over to SSS Wednesday challenge where it's all about the Sentiments this week. And to Shopping our Stash #200 where it's about Big, Bold and Beautiful.

Thanks for visiting.

Friday, May 8, 2015

STAMPlorations inspiration #16

It's inspiration time again at STAMPlorations. Check it out, there are lots of great baby card ideas.  I used the mom-to-be from The Bee's Knees BabyBump.


And some balloons die cut with SSS Balloons from watercolored scraps. And a rounded corner. That's all. If you feel like CASEing this card, I'd love to see it in the May Inspiration CASE Playground.

Have a fabulous weekend, friends.

simply create too 85


What's your favorite color combo? Use it and show us your project over at Simply Create Too in challenge # 85.


I really can't say what my favorite color combo is. I love colors and so many work so well together. One that I think is underrated is yellow and purple. I see lots of it these days in the form of pansies adorning people's patios.

I've captured that inspiration on this thank you card using posies from Techinque Tuesday (using the reverse of the stamps to stamp the solid colors) and a die cut from Cuttlebug.

Join us at Simply Create Too, won't you?

Thursday, May 7, 2015

bleeding tissue and puffy stickers


The next challenge for iNSD that I am joining at Winne Walter and Pinkfresh is Make your own Background. This would logically have been the first one I jumped at, but there were just too many possibilities!

Enter Loll, who told me about Eileen, who has a video about bleeding tissue paper. Frugal gal that I am, recycled tissue paper (from gift bags) became the starting place for my first card today.

Bleeding tissue paper gives you a variation on the watercolor look. It is so cool. And fast. And can be so wonderfully pastel. TIP: Use crepe paper if you want more vibrancy. To the blue, pink and yellow splotches I added some frosty pink splatters and tiny white stars using Sugar Rush. Voila! A background.

100_5835

I stamped and fussy cut the cupcake from the same set and gave it a topper of sequins (cuz I'm joining the Sequins challenge too) and cuz they shine so purty :) And this was obviously a girlie card so I die cut "celebrate" from Big, Bold Party from metallic silver CS. When I saw the cardboad (from a package of cookes!) it matched the silver perfectly so I went with some recycled cardboard too. You can see the sparkle on the splatters and die cut and even the WoS on the cupcake frosting better below.


So next up, Puffy Stickers. I don't have a lot of these but I did recently pick some up at my dollar store cuz I found them so nice and graphic.


How to incorporate little French puffy stickers onto a card?

100_5834

Tried to incorporate some Francais, but didn't have a huge choice of messages to go with the "hello" from In a Word Hello. I went with "thinking of you" from Artemio floating on a banner (Big, Bold Extras) from the top of the Eiffel Tower!

I'm going over to SSS Wednesday challenge where it's all about Sentiments this week. My die cut sentiments pretty much take center stage. Card #2 even has two sentiments!

Hope you enjoyed. Au revoir!

Wednesday, May 6, 2015

lotsa white


I'm still having fun with my Winnie and Walter goodies and playing in the iNSD challenges WW and Pinkfresh Studio are holding. Ready for lotsa white space?


My inspiration came from the lower right and upper left photos from the Mood Board challenge - light and airy white on white like the gown and a touch of yellow like the washi tape. This is actually going to the same sweet girl I made this canvas for.


I layered white embossing paste through a stencil sent to me by the lovely Loll to my cardbase. I layered In a Word Hugs, which was watercolor paper smooshed with Distress Inks and splattered with gold, onto three layers of yellow CS to achieve a glow behind it. Notice the sweet little butterfly perching on the "s"? From Essentials: Audrey.


Isn't that light and airy dimension wonderful? The roses and leaves are from Maggie's Roses.

Then there is this Card Sketch challenge. Hard not to go with circles, but I ended up using stars.


Notice the multifaceted star? Like Kelly G., I had perused the facets of the Multifaceted die cut for geometric shapes and found this wonky star! Even used some of the "fallout" to make my little stitched banner under the sentiment :)


The stripes behind the focal image were made with clear embossing paste through the SSS Diagonal Stripe stencil. The other stars were die cut with Sizzix Star framelits die from tissue paper and CS. My sentiment is composed of a stamp from The Big, The Bold and Extras and a word from ARTplorations Hello and Company.

Notice the hole in the turquoise star? I'm playing here.


 And I may be pushing the limits of CAS, but I'm hooking up at Happy Little Stampers.


Lots to do today. Hope the sunshine sticks around. Enjoy your day.
Related Posts Plugin for WordPress, Blogger...